WOODEN FURNITURE & HOME
Reference-based editorial guide, prepared with AI assistance. Not a Wood Center build or test.
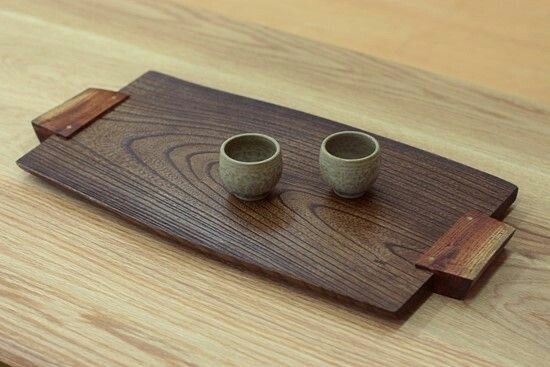
A wooden serving tray with handles starts with a flat base, a fitted frame, and hardware positioned where you can comfortably grip it. Cut and dry-fit the wood, prepare the handle holes, join the base and sides, then finish the surfaces and install the handles. A contrasting rim can add a furniture-like detail for a coffee table or ottoman.
Gather wood, handles, and assembly tools
Choose the hardware before cutting the wood. A handle that fits a cabinet door may leave too little room for its mounting screws above a tray base. Our decorating with wood guide helps place the finished tray among the other wood tones in the room.
- A flat plywood panel for the base
- Straight solid-wood strips for the surrounding frame
- Optional solid-wood trim for a contrasting top rim
- Two handles and their specified mounting hardware
- Wood glue suited to the joints and intended use
- Brad nails selected for the actual side and base thicknesses
- A tape measure, square, pencil, clamps, drill, bits, and screwdriver
- Suitable cutting equipment, a brad nailer, sanding supplies, and dust extraction
- A compatible primer, paint, stain, or clear-finish system
Use the manuals for each power tool, including its work support, guarding, and protective equipment requirements. Keep clamps, hands, and hidden hardware out of cutting and fastening paths.
Size the tray around its place in your home
Before buying a large panel, lay paper or cardboard on the intended surface. Arrange a cup, coaster, or other items on it, leaving room to pick them up. Allow for the frame and projecting handles as well as the usable area inside.
Measure the plywood you actually have. Nominal lumber names are not finished measurements, and a small thickness change affects both the frame fit and fastener choice. Check that the base is square before using it to lay out the surrounding pieces.
For a close-fitting, 45-degree mitered frame around a base measuring L × W, with frame thickness t, the ideal outside footprint is (L + 2t) × (W + 2t). The corresponding frame pieces measure L and W between the short points, or L + 2t and W + 2t between the long points. These relationships describe the layout, not a universal cut list: verify the actual stock thickness, saw setup, and fit on scraps before cutting the final pieces.
Make the frame taller than the base is thick, leaving an inside wall above the plywood. Check that this exposed area accommodates the handle holes and screw heads, with room to use a screwdriver. Label the pieces and their orientation. If choosing square-ended corners, redraw which pieces overlap; miter lengths cannot simply be reused.
1. Dry-fit the base, frame, and optional rim
Place the base on a flat work surface and arrange the frame around it without glue. Check the corners with a square and look for gaps along the plywood edges. The base should sit flat without needing clamp pressure to bend it into place.
Mark the base level on the inside of each handle end. Hold the handle in position and check its screw locations against that line. Leave access for a screwdriver inside the assembled tray; a hole hidden behind the base will be difficult to use.
2. Drill the handle mounting holes while the ends are loose
Use the actual handle or its supplied template to mark the hole spacing. Center the handle visually on the end, then check both ends against each other. Do not assume two different handle models use the same spacing.
Clamp the end piece over a sacrificial backer and drill to the hardware maker’s specified diameter. Rear-mounted machine screws need a clearance hole through the wood; that is different from a small pilot hole for a wood screw. Check the hardware type before choosing the bit.
Test-fit the handles and screws, then remove them for assembly and finishing. With a through-mounted pull, screw length must suit the wood thickness and the handle’s threaded depth: a screw that bottoms out can feel tight while leaving the handle loose. For hardware driven into wood, also check that the screw tip cannot emerge through the opposite face. For that last type of fixing, the pilot-hole guide explains the receiving hole and the clearance through a top piece.
3. Join the frame to the plywood base
The reference assembly uses glue and brads through the side frame into the plywood edge. Fit that joint on scraps first: the fastener must pass through the frame and enter the panel without breaking out of its top or bottom face. A different base thickness needs its own fastening decision.
Spread glue on the mating bare-wood surfaces and clamp the first side in position. Keep its bottom aligned with the base and check that the handle holes remain clear. Follow the nailer’s instructions and keep your hands away from the possible brad path; a brad can deflect through an edge.
Continue around the base, checking the corner fit and squareness as each side is added. Remove glue squeeze-out as directed by the adhesive maker. Allow the specified clamping and curing time before sanding or stressing the assembly; nails do not make uncured glue ready for use. Compare wood glue and epoxy by joint fit before substituting a different adhesive for the tray assembly.
4. Prepare the surfaces and plan the contrasting rim
Once the joints are ready to handle, check for proud fasteners, glue residue, and sharp corners. Sand only as much as the wood and coating require. Keep the plywood face veneer intact, and ease the edges your hands will touch without rounding away the corner fit.
If adding contrasting top trim, fit and label it before finishing. Mask its glue-contact faces and the matching frame surfaces so they remain bare. Titebond’s guidance explains that paint and stain can interfere with its wood glues penetrating the wood. Follow the particular adhesive’s requirements rather than relying on a bond to a coating.
Attach the fitted trim with the selected glue and suitable brads, keeping the fasteners within the frame beneath it. Treat this rim as an optional visual detail, not an added load rating. Give the joints their required curing time before completing the finish.
5. Finish the tray before attaching the handles
A painted base with a wood-toned rim can connect the tray to nearby furniture. Try the full coating schedule on matching scraps first; the color on plywood may differ from the color on solid trim.
Follow the labels for surface preparation, primer, coats, sanding, and recoat intervals. If combining stain and a clear coat, confirm that the products are compatible and that the stain is ready for topcoating. Minwax’s clear-finish guide recommends following the product directions and avoiding overly thick coats.
Let the complete finish reach the label’s stated readiness for use. Dry-to-touch and ready-to-recoat times are not automatically the same as full cure. Keep finish out of the handle threads and mounting holes.
6. Install the handles and check the tray
Seat each handle over its prepared holes and install the correct screws. Tighten with control so the mounting points sit securely without crushing the wood or distorting flexible handles. Check for sharp or projecting fasteners on the inside and underside.
Inspect the base-to-frame joints before lifting the empty tray. Stop if anything shifts, opens, or cracks. There is no verified carrying capacity for this draft: handle hardware, plywood edges, and joints all affect performance. Support the base from below when moving items, and keep heavy or fragile contents off an unverified build.
Use the tray as a practical home accessory
On an ottoman, check that the tray sits level and does not rock on the upholstery. Keep drinks in stable cups with coasters, and use saucers or dishes for food. A decorative wood finish is not automatically suitable for direct food contact or cutting.
Wipe up spills promptly, clean according to the coating instructions, and avoid soaking the tray. Inspect the handle attachments and frame joints during use. If a joint becomes loose, take the tray out of service until the cause has been corrected. Explore more wooden furniture, care and home project guides at Wood Center.